

Maintaining and cleaning Keurig needle is easy and a very essential task that you must perform as part of your regular bi-weekly deep cleaning and descaling of your Keurig coffee maker.
The instruction I give you below will unblock, clean and clear your coffee maker of all dirt, grime and gunk that builds up in, near and around both the needles of your coffee machine.
Keep reading for the details!
Cleaning Keurig Needle
Table Of Contents
- 1 Cleaning Keurig Needle
- 2 Keurig 2.0 Needle Cleaning Tool
- 3 How To Clean Keurig Needle With Paper Clip
- 4 How To Clean Keurig Exit Needle
- 5 Keurig 2.0 Needle Maintenance
- 6 Keurig Needle Maintenance Still Not Working
- 7 Frequently Asked Questions About Cleaning Keurig Needle
- 7.1 Is It OK To Use Vinegar To Descale A Keurig?
- 7.2 What Happens When You Run Vinegar Through A Keurig?
- 7.3 Does Baking Soda Clean Keurig?
- 7.4 Does Running Hot Water Through Keurig Clean It?
- 7.5 Can I Run Bleach Through My Keurig?
- 7.6 How Long Does It Take To Descale A Keurig?
- 7.7 Does Vinegar Damage Coffee Maker?
- 7.8 Why Is My Keurig Not Working After Descaling?
- 8 Final Thoughts – Cleaning Keurig Needle
Cleaning your Keurig needle, regardless of which machine and model you have, is an essential task that must be performed at least twice per month to keep the in perfect working order and perfect condition for brewing.
Don’t worry if you have left it too long, as I’ll tell you how to unclog your needles and get the tubes leading up to the clean and clear of any coffee oils and other material that may be blocking them.
Make it a habit to clean your needles as part of your descaling process and descale your coffee maker every other Sunday as preventative maintenance measure and keep your coffee machine clean, and clear of coffee grounds from building up inside and causing a blockage.
Above all, it prevents old coffee oils from building up, going rancid and producing horrid tasting coffee.
Let’s get to the details!
Read: Keurig needle cleaning
Keurig 2.0 Needle Cleaning Tool
Your Keurig 2.0 needle cleaning tool is essential for performing correct and perfect Keurig needle maintenance as recommended by the manufacturer.
It’s that orange tool that comes with your coffee machine. If you have lost it and simply can’t find it, don’t worry as you buy a replacement from Walmart, Amazon, eBay, Keurig website and all the usual online retail outlets.
Pro Tip: When your new Keurig needle maintenance tool arrives, keep the little plastic bag that it arrives in and use sticky tape and tape it to the rear or side of your coffee maker. This way you will never lose it.
How To Clean Keurig Needle With Paper Clip
Some coffee lovers like to use a paper clip to clean their needles using a paper clip instead of using the needle cleaning pod.
Personally, for a high quality deep clean and ensuring that there is nothing that is inhibiting the flow of hot water I use both a paper clip or a safety pin, or any long thin needle that I can find.
Here is how to clean your puncture needle, also known as the entrance needle with a paper clip.
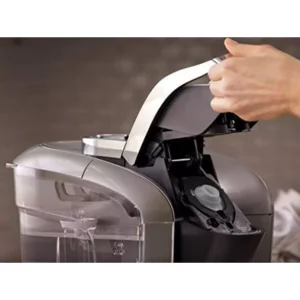
Open the brew head of your Keurig coffee maker, locate the entrance needle, which is directly above where you put your Keurig K Cup.
These needles are sharp, take proper care and attention as to not injure yourself. Using an unfolded paper clip, poke around inside the entrance needle for 60 seconds or so and remove any blockages and build up coffee grounds.
Use a long thin straw and blow inside the needle to blow away and clear any coffee granules, particle and grounds.
Using a pipe cleaner or two twisted together, dip them in cleaning vinegar and poke around for approximately one minute to clean the inside of the needle and the tube cleaning up to the needle.
Repeat this step with a fresh clean pipe cleaner until you notice that your pipe cleaner is coming out clean.
Now clean the exterior of the needle and the surrounding area with cleaning vinegar and a cotton bud.
How To Clean Keurig Exit Needle
To clean your exit needle, follow the same procedure as cleaning the entrance needle.
Your exit needle is located where your pod holder is. Remove the K cup holder carefully to gain better access to the needle and proceed to clear any blockages with an unfolded paper clip before blowing free the coffee grounds with a straw.
Poke around with pipe cleaners dipped in cleaning vinegar. Clean the exterior of the exit needle and the immediate area around it with a cotton bud dipped in cleaning vinegar.
Read:
Keurig 2.0 Needle Maintenance
At this point a great part of your Keurig 2.0 needle maintenance routine is done, at least the best part of it, your needles are super clean, spotless and completely unblocked. The dirt, grime and oil leading up to your coffee maker’s needles has been completely removed.
In short, they are as good as they were when you first bought your Keurig machine.
Please keep your Keurig in this condition with regular cleaning every other Sunday.
Now it is time to use your Keurig Needle maintenance tool to give your exit needle and the entrance needle the finishing touch.
Start by filling your needle cleaning tool with hot water and placing it in the pod holder and aligning it correctly.
If you are unsure how to align it correctly, put it in its place while empty and do a dummy run to make sure it is correctly aligned. Slowly close the brew head with care and attention.
If the cleaning pod is incorrectly aligned, it may break your needles.
Once you have your cleaning pod correctly in its place and filled with hot water, open and close the brew head 5 to 7 times.
Repeat this step with a solution of cleaning vinegar and water in equal amounts to get your needles and tubes leading up to them clean.
Run a second cycle with vinegar and clean water in your needle cleaning tool for a good deep clean.
At this point your needle cleaning is complete.
But,
the rest of your machine, the internal tubes and pipes are still dirty and may have blockages due to a build up of minerals, calcium and limescale which will affect the functionality of your machine and the flavor of your coffee.
Fill your water reservoir to the max fill line with water and cleaning vinegar, using equal amounts of each. Run a complete brewing cycle until it is empty.
Repeat for a second time to ensure that your machine is completely clean and clear of the build up of minerals.
You must flush your machine of all traces of vinegar by running complete brewing cycles of fresh water only. You may need to run 5 to 7 water tanks full of water to rid your machine of all scents and traces of the vinegar.
Congratulations, your Keurig brewer is in perfect condition, optimal condition for making perfect coffee.
Keep it this way by running this process every other week.
Keurig Needle Maintenance Still Not Working
If your Keurig needle maintenance and the full descale cycle has not fixed any operating errors due to blockages inside your coffee maker, and descaling as I described above, I suggest that you contact Keurig customer support.
There may be some other problem with your machine, such as a broken or partially functional water pump.
Frequently Asked Questions About Cleaning Keurig Needle
Is It OK To Use Vinegar To Descale A Keurig?
Yes, it is perfectly okay to use distilled white vinegar if you have run out of Keurig descaling solution. It’s also okay to use vinegar as your regular descaling solution when cleaning your Keurig coffee maker.
Be sure to dilute your white vinegar with an equal amount of fresh clean water.
What Happens When You Run Vinegar Through A Keurig?
When you run vinegar of all types be it apple cider vinegar, malt vinegar, distilled white vinegar or wine vinegar the result is the same: It will help to get your Keurig coffee maker clean, remove the build up of mineral deposits, coffee oil and will sanitize your machine.
Does Baking Soda Clean Keurig?
Yes, baking soda, also known as bicarbonate of soda, is a great solution that you can use to clean your Keurig machine. It’s cheap, effective and gets the job done. Fill your water reservoir with a 25% bicarbonate of soda and 75% water solution and run a full and complete descale cycle.
Repeat to ensure a full and proper cleaning of your coffee machine. Then run 3 to 5 rinsing cycles with clean water.
Bicarbonate of soda is easier to clear from your machine than vinegar and does not negatively affect the flavor of your coffee as much.
Read: Keurig needle maintenance
Does Running Hot Water Through Keurig Clean It?
No, hot water does not get anything clean, least of all your Keurig coffee maker. Hot water alone will not remove the coffee grounds, coffee oil or the build up of minerals.
Can I Run Bleach Through My Keurig?
No! Never run bleach, be it run undiluted or diluted bleach through your coffee maker. It will put your machine out of use for far too long until you manage to rid your coffee machine of the toxic harmful traces and fumes of bleach.
All the cleaning solution that you use to run through your coffee maker should be food grade, food safe. Even though vinegar leaves traces of vinegar and scents of it, it is easy to remove and above all, it is not harmful.
How Long Does It Take To Descale A Keurig?
It should take you approximately 45 minutes to fully descale your Keurig coffee maker and 75 minutes to descale your K-Duo brewer.
While Keurig’s descaling solution is best as it is custom designed for Keurig coffee machines, you can use bicarbonate of soda, distilled white vinegar, citric acid, lemon juice or hydrogen peroxide.
Does Vinegar Damage Coffee Maker?
Yes, it is true that vinegar can damage the internal parts of a coffee maker.
This is not a reason to avoid using vinegar, as all cleaning solutions, including Keurig’s one descaling solution, will damage your coffee maker.
The damage is slow, gradual and over time. The cause is the acidity of the cleaning solutions, which is essential. If it is not acidic, it will not clear your coffee machine of mineral build up.
Why Is My Keurig Not Working After Descaling?
There are a number of reasons why your Keurig may not be working after descaling it, one of the principal reasons is that your needles may be blocked with debris, coffee grounds, gunk and even tiny parts of foil.
Clean your needles and run a second descaling cycle.
Final Thoughts – Cleaning Keurig Needle
This guide to maintaining and cleaning Keurig needle has detailed the method that I personally use and what I consider to be the most detailed way of cleaning your needles and getting them properly clean.
Join our fun and friendly coffee community where we discuss all things’ coffee from beans to recipes, brewing methods and more.
Derek Marshall
Derek Marshall, a certified barista by the Specialty Coffee Association possesses over two decades of experience in specialty coffee shops. He holds professional certifications for coffee brewing and barista skills. Derek is also an author with authoritative books covering various coffee topics including specialty coffee, sustainability and coffee, coffee brewing, coffee recipes, coffee cocktails and books focusing on Brazilian coffee, Vietnamese coffee, Indonesian coffee and Malaysian coffee. As a barista for over two decades, Derek Marshall has worked in specialty coffee shops across the United Kingdom, Spain, Thailand, Malaysia, Cambodia, Indonesia, and Vietnam. His expertise extends to the distinct coffee cultures, specialty beverages, and brewing techniques of each nation. Functioning as a coffee consultant, Derek charges US$50 per hour. To learn more about Derek Marshall and Latte Love Brew, visit his About Me Page. For coffee inquiries, contact him at +34-639-410-375 or Derek@LatteLoveBrew.com, mentioning your name and location