

Last updated on January 22nd, 2024 at 13:12
Keurig needle maintenance and general overall preventative maintenance is important for keeping your Keurig unit in fine working order and serving your tasty and delicious coffee every single day.
Thankfully, these maintenance tasks are easy to perform and take only 5 to 10 minutes.
Keep reading to learn how to maintain your Keurig needle.
Essential Keurig Needle Maintenance – What Is The Keurig Needle?
Table Of Contents
- 1 Essential Keurig Needle Maintenance – What Is The Keurig Needle?
- 2 Essential Keurig Needle Maintenance Using The Needle Maintenance Tool
- 3 How To Perform Keurig Needle Maintenance On Keurig Without Tool
- 4 Keurig Needle Maintenance Still Not Working? Try This!
- 5 Basic Keurig Maintenance With White Vinegar
- 6 Frequently Asked Questions About Keurig Needle Maintenance
- 7 Final Thoughts – Keurig Needle Maintenance
Getting to the very beginning let’s start by talking about what a Keurig needle is before I get down to talking about Keurig needle maintenance.
We are not talking about one needle, we are talking about two needles, an entrance needle and an exit needle both of which work together at the same time.
- The Entrance Needle: This is a sharp metal entrance needle that functions as a puncture needle that pierces your Keurig K-Cup coffee pod at the top and into the bed of coffee below. It provides an inlet for your hot water to brew you a delicious cup of coffee.
- The Exit Needle: The exit needle is found at the bottom of the K-Cup coffee pods. It, too, can be described as a puncture needle. This needle functions as an aid to assist the flow of the freshly brewed coffee into your cup.
Be particularly careful when you are handling the needles as they are very sharp.
If you don’t perform essential Keurig needle maintenance and regular preventative maintenance on your Keurig coffee maker, either the entrance needle or exit needle will become blocked. In the worst possible situation, both will become clogged as will your tubes where the coffee and water flows.
It is the buildup of mineral deposits from your water and the gradual accumulation of tiny coffee grounds building up that clogs both your needles and the tubes of your coffee machine.
I am a strong believer in preventative maintenance as it is better to prevent a problem from happening than to fix it after it has happened.
Thankfully you have a lot of options and different ways to keep your machine and your needles well maintained.
Let’s get talking about those.
Read: How to unclog Keurig needle
Essential Keurig Needle Maintenance Using The Needle Maintenance Tool
The very first step when you are opening up any machine is to pay special attention and make sure that it is switched off and unplugged.
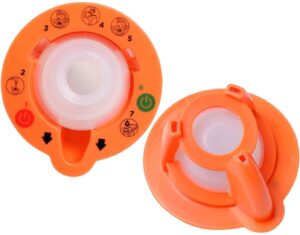
Get your specialized Keurig needle cleaning tool and get ready to unclog that clogged needle.
Fill your specialized needle cleaning tool with water. I like to use hot water, and open your Keurig brew head and with due care slot the needle cleaning tool into the pod holder. The arrows should point towards you while at the same time the green power button is positioned on the right.
This next step is what does the cleaning of the needles and is what performs the cleaning action. It is as simple as closing and opening the brew lever and repeating the opening and closing of it 5 to 6 times.
When you open up the brew lever for the last time you should see some dirt and grime around the cleaning tool.
At this point, it is your choice if you want to run a rinse cycle with Keurig rinsing pods and give your machine and the tubes a real good internal clean or run a simple flushing cycle to get rid of the loose dirt and grime from the needles.
You have to pick one as if you fail to you will get all that dirt in your next cup of coffee.
To flush the dirt out, run 3 to 5 brewing cycles with clean fresh water.
How To Perform Keurig Needle Maintenance On Keurig Without Tool
This Keurig needle maintenance technique involves the use of no tools. I’ll talk about more tool free methods later.
In this particular method, we are going to use a Keurig rinse pod. In the strictest of terms, these rinse pods are not specifically designed for the purpose of cleaning needles or needle maintenance.
The pods do have the secondary effect of cleaning the needles and keeping them clear if and when they are reasonably clean. They are not the tool to use to unblock them.
I strongly advise using this method in conjunction with either the method above or the one below to keep your coffee maker clean.
Using these cleaning pods is incredibly simple: take a cleaning pod and pop it in the pod holder and run a brew cycle.
When the cleaning is complete, run 3 to 5 rinsing cycles with clean water to flush your machine of the cleaning solution.
This particular method is good at keeping the exit needle clean. At Latte Love Brew We Encourage you to keep your needle and your machine clean. A clean machine means clean and great tasting coffee.
Keurig Needle Maintenance Still Not Working? Try This!
If your Keurig needle maintenance is not working then this technique will get all dirt, grime and debris that is blocking and clogging them free.
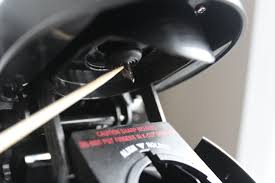
All you need is a thin, long and sharp tool. A sewing needle, safety pin, or a straightened-out regular paper clip.
Safety first, and switch off and unplug your machine.
Open the brew head and locate the entrance needle. You will find it on the upper part of the brew head. With great care, since these are very sharp, insert your paper clip, needle, or pin inside the entrance needle and move it around back and forth poking manner for 30 seconds to remove the blockages.
This method will clear your needle, you will notice debris and dirt dropping. Some dirt will get stuck in the needle, and thus you will need to flush your machine.
Flushing with Keurig rinse pods is a great idea and is much better than running a simple flush with fresh water.
You can also give some serious consideration to the following methods to clean and flush your pipes and needles of the dirt.
Basic Keurig Maintenance With White Vinegar
Giving your machine a real good clean with distilled white vinegar is a method that I love, swear by, and use myself for all my coffee gear at least every other week.
Best of all it is easy and effortless.
Start by giving the exterior of your Keurig unit a good clean with a damp cloth and cleaning the drip tray. Remove the water reservoir and clean it well.
Fill your water reservoir with a solution that is 50% clean water and 50% distilled white vinegar.
Use a large carafe or mug to catch the solution that comes out. Press brew – my preferred method to start a brewing cycle. Repeat this action until your water reservoir is empty of the water and vinegar solution.
Once finished, wash and clean your reservoir with an abundance of water, flush it and rinse it well. Let it air dry to get rid of all traces of vinegar.
When your water tank is dry, fill it with water 3 to 5 times and run multiple brew cycles to flush the traces of vinegar from inside your coffee machine.
This is a routine that will prevent your needles from getting blocked and ensure that your machine is clean and serving your fresh and tasty coffee every single time.
Frequently Asked Questions About Keurig Needle Maintenance
How Do I Clean My Keurig Exit Needle?
Performing needle maintenance and cleaning the exit needle is easy. One of the easiest ways is to use the Keurig needle maintenance cleaning pod.
Simply fill it with hot water, put it in the pod holder and open and close the brew lever 5 to 6 times. The opening and closing action cleans the needle. Use a rinsing pod to clean the internal tubes.
The final action is to flush your machine using clean water only running 3 to 5 cycles.
Another method is to insert a regular paper clip into the tube that you see at the bottom of your pod holder.
Turn the pod holder upside down to give the exit needle a good clean by inserting a straightened out paper clip and giving it a good poke to loosen any dirt.
When you have cleaned the needle, run a descaling cycle with a 50% distilled vinegar and water solution followed by 3 to 5 rinsing cycles with clean water.
Can You Replace The Needle In A Keurig?
Yes, the needle, both of the exit needle and entry needle can easily be replaced as can the pod holder, brew head and heating element as well as other parts.
You can and will find the spare parts on Amazon, Walmart, eBay and Target.
Why Does My Keurig Needle Keep Getting Clogged?
Your Keurig machine and needle get clogged for two main reasons: a buildup of coffee grounds and calcium and other mineral deposits building up in the tubes and needles.
Why Is My Keurig Waking Weird Noises After Brewing?
Keurig machines give a blast of air through the whole machine when the brewing cycle is finishing to clear any residue before the next use. You’ll notice a few extra drops getting into your cup of coffee.
How Do You Tell If Your Keurig Is Clogged?
Key tell-tale signs that your Keurig machine is clogged and needs cleaning are:
- You are getting an empty cup of coffee.
- Your machine is spitting out coffee.
- The coffee is just dripping out.
- Your Keurig is starting to spit out coffee.
When you notice any one of these signs, it is time to give it a good clean.
What Happens When A Keurig Doesn’t Descale?
If descaling your Keurig doesn’t work and the light stays on, move up a level and run a more concentrated solution of distilled white vinegar.
Try a second attempt with a 75% vinegar solution and 25% water. If this doesn’t work, run a 3rd cycle with 80% distilled white vinegar and 20% water solution.
Each time run 3 to 5 complete rinsing cycles by filling the water reservoir with clean water and running brew cycles until the water reservoir is empty. Do this 3 to 5 times.
Final Thoughts – Keurig Needle Maintenance
You have no excuses for not performing Keurig needle maintenance as all tasks outlined are easy, take no more than 5 to 10 minutes and most don’t require any specialist equipment.
Which method did you try and how did it work out?
Do you have any of your own Keurig needle maintenance tips & tricks?
Join our online coffee community on Facebook/Meta and share you secrets on how you keep your needle clean and clear.
Derek Marshall
Derek Marshall, a certified barista by the Specialty Coffee Association possesses over two decades of experience in specialty coffee shops. He holds professional certifications for coffee brewing and barista skills. Derek is also an author with authoritative books covering various coffee topics including specialty coffee, sustainability and coffee, coffee brewing, coffee recipes, coffee cocktails and books focusing on Brazilian coffee, Vietnamese coffee, Indonesian coffee and Malaysian coffee. As a barista for over two decades, Derek Marshall has worked in specialty coffee shops across the United Kingdom, Spain, Thailand, Malaysia, Cambodia, Indonesia, and Vietnam. His expertise extends to the distinct coffee cultures, specialty beverages, and brewing techniques of each nation. Functioning as a coffee consultant, Derek charges US$50 per hour. To learn more about Derek Marshall and Latte Love Brew, visit his About Me Page. For coffee inquiries, contact him at +34-639-410-375 or Derek@LatteLoveBrew.com, mentioning your name and location


![[Recipe] How To Make Dunkin Iced Coffee At Home Like A Pro!](https://lattelovebrew.com/wp-content/uploads/2022/04/Recipe-How-To-Make-Dunkin-Iced-Coffee-At-Home-Like-A-Pro-1024x576.jpg)