

Last updated on June 6th, 2024 at 14:14
Keurig 2.0 needle maintenance is an essential part of preventative maintenance and ensuring that your single serve coffee maker continues to brew perfect coffee every single time.
There is nothing difficult, and it should take you less than 10 minutes to complete.
Keurig 2.0 Needle Maintenance
Table Of Contents
- 1 Keurig 2.0 Needle Maintenance
- 2 How To Perform Needle Maintenance On Keurig
- 3 Keurig 2.0 Needle Cleaning Tool Instructions
- 4 Frequently Asked Questions About Keurig 2.0 Needle Maintenance
- 4.1 Why Does My Keurig Keep Saying Needle Under Pressure?
- 4.2 How Often Do You Clean The Needle On A Keurig?
- 4.3 Do Keurigs Require Maintenance?
- 4.4 Is It OK To Use Vinegar In A Keurig?
- 4.5 How Do You Tell If Your Keurig Is Clogged?
- 4.6 What Button Do I Push To Descale My Keurig?
- 4.7 How Do I Know If My Keurig Is Dying?
- 4.8 Does Baking Soda Clean Keurig?
- 5 Final Thoughts – Keurig 2.0 Needle Maintenance
Performing needle maintenance on your Keurig 2.0 or any single serve coffee maker is something that needs to be performed regularly, more often than perhaps you realize.
Personally, I like to clean mine with a full descale cycle every other week. I use a very peculiar method that ensures that your needles are clean, clear and above all fully disinfected, clean as whistle and ready to brew you perfect coffee every single time.
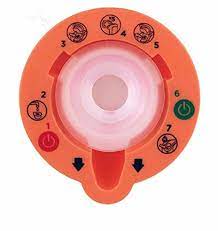
Look out for your Keurig brewer maintenance tool, the orange tool that came with your coffee machine, as you are going to need to use it.
Read: Where is the filter on a Keurig 2.0?
How To Perform Needle Maintenance On Keurig
This step, for fabulously clean needles, I perform twice, once before a full descale cycle to ensure that the needles are not blocked and prevent the mineral deposits from being blocked and exiting the system, to prevent them from blocking your needles.
The second cleaning is performed after the descaling cycle to ensure there is no calcium, minerals or anything at all blocking your needles.
Equipment Needed For Perfect Needle Maintenance
Very few pieces of specialist equipment are needed for cleaning your Keurig entrance needle and exit needle.
Here is what you will need:
- Keurig needle maintenance tool.
- Cleaning vinegar.
- Fine needle or paper clip.
Cleaning vinegar is better than regular vinegar for cleaning your coffee maker and removing mineral build up as it is stronger and more acidic, usually 50% stronger.
Keurig 2.0 Needle Cleaning Tool Instructions
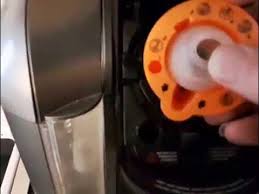
Start by looking out for the equipment that you will need and locate your Keurig needle maintenance tool. It’s the orange tool that your coffee maker comes with. I keep mine stuck to the back of my machine with sticky tape to ensure that it is not lost.
If you have lost yours, you can buy one on the Keurig website or from eBay.
Step 1: Open The Brew Head Of Your Machine
Locate the sharp metal entrance needle, also known as the puncture needle. You’ll find it on the top part of your brew head.
With a fine needle or paper clip, poke around inside the needle for approximately one minute. Pay attention to give a 360 degree clean and clear any blockage from all angles.
Be careful as this needle is sharp. If it is no longer sharp and struggling to or not puncturing your K Cups, consider buying a puncture needle replacement and replacing your puncture needle.
Your needle over time will eventually become blunt. You can buy it in advance and save them for when you need it.
Locate the exit needle, which will be located on the bottom part of your Keurig coffee maker and perform the same task with due care and attention. It is important to poke around inside the hollow needle holes to clear them of debris.
If you have a blunt exit needle, you will need to replace it. Now is a good time.
Read: Needle maintenance Keurig 2.0 without tool
Step 2: Locate And Use Your Orange Needle Maintenance Tool
Fill your Keurig needle cleaning tool with hot water, as hot as you can safely manage without burning yourself.
Put your cleaning tool in place, exactly where you would put a K Cup and align it correctly. Open and close the brew head 5 to 7 times.
This will force the hot water through the jet lines and free up any debris.
This is where all other quick needle cleaning guides end. Let’s go a step further and deep clean your needles and jet lines as there can still be coffee oil and all kinds of dirt stuck there that is detrimental to the quality of your coffee.
Step 3: Deep Cleaning Of Your Needles And Jet Lines
This step is straight forward. Your needles are basically clean and have all the hardened debris removed that is in the vicinity of the needles, but the deeper dirt that is further back and out of the reach of your paper clip.
Fill your Keurig specialized needle cleaning tool with 50% cleaning vinegar and 50% hot water and place it in the correct place. Repeat the same opening and closing of your brew head 5 to 7 times to pump and force the solution through your needles.
Repeat this step a second time.
Both your needles should now be perfectly clean and your jet lines clear of any build up of grime and dirt.
Read: Keurig needle maintenance
Step 4: Fill Your Water Reservoir With Fresh Water
Since you have been using a small amount of vinegar, you will need to flush away any scent and trace of vinegar from your coffee maker.
Fill your water reservoir with fresh clean water to the max fill line and run a complete brew cycle. Repeat this process to eliminate all traces of vinegar.
Your needles are now perfectly clean.
This step, step 4, can be replaced with running a complete descaling cycle and performing a deep clean of your coffee maker. When your deep clean has been complete, run a second cleaning of your needles as any dirt from deep inside your machine may funnel to your needles and start blocking there.
Frequently Asked Questions About Keurig 2.0 Needle Maintenance
Why Does My Keurig Keep Saying Needle Under Pressure?
When you Keurig keeps saying needle under pressure, it is a sign that your needle is blocked with coffee grounds or some other debris. This is usually caused when coffee grounds have been blow up the puncture needle.
Fixing it is easy. Open the brew head and poke around inside the puncture needle with a paperclip or a fine needle. Rinse with warm water.
How Often Do You Clean The Needle On A Keurig?
Rather than waiting until your needle gets dirty or clogged, cleaning is a matter of habit and maintenance. Clean every other week, every 15 days to ensure that your entrance and exit needles are clean. Use the needle cleaning tool to get the job done and ensure that your Keurig keeps serving your great-tasting coffee.
Do Keurigs Require Maintenance?
Yes, your Keurig coffee maker requires it to be descaled, and the needles cleaned regularly to prevent them from getting blocked and to prevent the build up of minerals, calcium and limescale.
Is It OK To Use Vinegar In A Keurig?
Yes, it is perfectly ok for you to clean and descale your coffee maker using distilled white vinegar.
How Do You Tell If Your Keurig Is Clogged?
One of the tell-tale signs of your Keurig being clogged is your coffee machine stops brewing full cups of coffee or brews only half cups of coffee. Most of the clogs are caused by mineral build up or by coffee grounds. Regular maintenance cleans every other week will keep your machine clean.
What Button Do I Push To Descale My Keurig?
Activating the descale mode is easy. Press the 8 Oz and 12 Oz buttons at the same time for 3 seconds. When flashing, press the brew button. This will start the descaling process.
How Do I Know If My Keurig Is Dying?
One key sign of your Keurig dying on you is when you notice that it takes ages for your Keurig to brew a cup of coffee or just simply stops brewing!
Does Baking Soda Clean Keurig?
Yes, baking soda is a great alternative to vinegar, lemon juice, citric acid and hydrogen peroxide.
Final Thoughts – Keurig 2.0 Needle Maintenance
I hope that you enjoyed this Keurig 2.0 needle maintenance guide and have perfectly clean needles and jet lines that are in optimal condition for making perfect coffee every time that you use it.
If you have any questions, seek me out on our social channels and ask; I answer all questions! While you are there, join our fun and friendly coffee community where we discuss all things coffee related. Find us on Facebook/Meta.
Derek Marshall
Derek Marshall, a certified barista by the Specialty Coffee Association possesses over two decades of experience in specialty coffee shops. He holds professional certifications for coffee brewing and barista skills. Derek is also an author with authoritative books covering various coffee topics including specialty coffee, sustainability and coffee, coffee brewing, coffee recipes, coffee cocktails and books focusing on Brazilian coffee, Vietnamese coffee, Indonesian coffee and Malaysian coffee. As a barista for over two decades, Derek Marshall has worked in specialty coffee shops across the United Kingdom, Spain, Thailand, Malaysia, Cambodia, Indonesia, and Vietnam. His expertise extends to the distinct coffee cultures, specialty beverages, and brewing techniques of each nation. Functioning as a coffee consultant, Derek charges US$50 per hour. To learn more about Derek Marshall and Latte Love Brew, visit his About Me Page. For coffee inquiries, contact him at +34-639-410-375 or Derek@LatteLoveBrew.com, mentioning your name and location