Last updated on March 15th, 2024 at 11:00
Learn how to prime a Keurig and get your coffee maker brewing coffee like the day you bought it!
Even thought the prime error message can be cause by something innocuous like the water reservoir not being correctly installed I still advise that when you see this message that you prime your Keurig to keep it in….well, prime condition for brewing coffee.
Keep reading for step by step prime process and focus on the part about cleaning of the needles and injection lines.
How To Prime A Keurig – Before You Get Started
Table Of Contents
Be or you start priming your Keurig you can try a few easy tricks to try out when you see the Keurig prime error and you might not need run a whole process. If you see the PRIME message appearing on the screen it may be something as simple as not attaching the water reservoir correctly or your coffee machine just needs to be reset.
First try to detach and then reattach your water reservoir and make sure that it is flush and lined up correctly as it should be. If that doesn’t fix it, then unplug your coffee machine and leave it for 15 to 20 minutes then replug it in.
This will reset your machine and may help to make the prime message disappear.

Read: Keurig won’t prime
Why Does Your Keurig Coffee Maker Say Prime?
The prime message on your Keurig coffee machine usually means that there is a dirt or calcium build-up somewhere in your appliance that is causing a blockage and inhibiting the water flow in your machine.
It may even been the build up of coffee ground or coffee particles in the needles.
As soon as you seen the prime message, take steps to run a full deep clean and descaling of your machine to get rid of the minerals, calcium and limescale that have built up in your machine.
How To Prime A Keurig
If you have never primed a Keurig or run a proper cleaning and descaling cycle, don’t worry! It’s very easy to do, nothing at all is complicated.
Just follow this step by step guide.
Equipment Needed
- Distilled White Vinegar or Keurig Descaling Solution.
- Keurig Needle Maintenance Tool.
- A cloth Or sponge.
- A Sewing Needle, Paper Clip Or Safety Pin.
The Keurig needle maintenance tool would have come with your coffee machine.
Let’s get on with this handy guide.

Read: Keurig says prime
Step 1: Switch Off And Unplug Your Keurig Coffee Maker
Water and electricity is a bad mix. Switch off and unplug your machine to be on the safe side.
Step 2: Empty Your Water Reservoir
If you have a removable water tank, remove it and wash it with soap and warm water using a soft cloth or sponge. Remove and clean all other removable parts including the drip tray and pod holder.
Step 3: Unclog The Needles
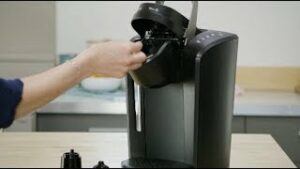
Open the brew head of your Keurig coffee machine and locate the puncture needle. Insert a paper clip, sewing needle or safety pin to dislodge and dirt or coffee grounds that have built up. Carefully wipe the entrance needle (puncture needle) with a cloth or sponge.
Repeat with the exit needle.
Locate the Keurig needle maintenance tool and fill it with warm water. Place it in the pod holder and open and close the brew head 5 to 7 times.
If your needles and injection lines are particularly dirty put 50% distilled white vinegar and 50% water and repeat the process of opening and closing of the brew head. Remove the needle maintenance tool from the pod holder when complete.

Step 4: Plug In Your Coffee Maker Then Run A Descaling Cycle
Put all the removable parts back together and add 50% distilled white vinegar and 50% water solution to your water tank and fill to the max fill line. Alternatively you can use a descaling solution or 25% bicarbonate of soda and 75% water.
The descaling process will remove the mineral buildup from the pipes, heating element and elsewhere in your machine.
Step 5: Run 3 To 5 Rinsing Cycles With Water
The last thing you want is the scent and taste of vinegar in your cup of coffee and thus you need to flush the scent and taste of it from your coffee machine. Fill your water reservoir with plain water and run several brew cycles until the scent of vinegar has gone.
This may take three to 5 cycles.
That it. You machine is now primed and ready to brew great coffee for you once again.
Frequently Asked Questions About How To Prime A Keurig
What Does It Mean When It Says Prime On A Keurig?
There are a few reasons why you see the “Prime” error on your Keurig. The most common reasons are:
- Your water reservoir is not attached properly.
- There is debris buildup or calcium build-up inside your coffee maker.
- The coffee pod holder and the needles need to be cleaned.
- The filter screen needs to be cleaned.
- The water filter needs to be replaced.
All of these Prime errors can easily fixed. If you have gone through this list and checked your brewer, you can simply switch it off and unplug it, wait for 15 minutes and plug it back in and power it up. Sometimes it’s just a matter of resetting it.
How Long Does A Keurig Take To Prime?
It takes 3 minutes on average for your Keurig to prime. Prime means when your machine is primed and ready for brewing a cup of coffee instantly or almost instantly. It is a question of how long it takes for water to be drawn from the water reservoir and heated up to the perfect temperature for brewing coffee.
How Do I Get Air Out Of My Keurig?
It is very rare that you will get an air bubble in your machine. However, it is very easy to fix. One way is to remove the water tank, unplug your machine and turn it upside down and empty the contents into your sink.
While the water is emptying, give your machine a tap on the sides and shake it. When finished, put the water reservoir back in place, plug your machine back and restart.
It’s a rare error.
How Do I Prime My Keurig With Vinegar?
Fill your water reservoir with distilled white vinegar to the half full line. Then fill to the max fill line with clean water. Start a brew cycle without putting a Keurig K cup coffee pod in the pod holder.
Repeat the brew cycle until your water reservoir is empty. Discard the contents after the brewing cycle.
Fill your reservoir with fresh water and run 3 to 5 brewing cycles to flush your brewer of the vinegar scent and taste.
Why Is My Keurig Taking Water But Not Brewing?
Your Keurig may not be brewing a cup of coffee due to:
- Your water reservoir is overfilled.
- Debris, dirt and calcium build-up.
- Inserting the wrong coffee pod.
- Coffee grounds and coffee particles may be blocking and clogging the needle.
Run through the checklist and take the appropriate action to fix the problem. When dirt and debris is the problem, clean the needles and run a descaling cycle then try to brew a cup of coffee.
How Long Do Keurigs Take To Preheat?
It takes approximately 3 minutes for a Keurig to preheat water.
Final Thoughts – How To Prime A Keurig
Knowing how to prime a Keurig is an important part in maintaining your coffee machine in optimal condition and serving you great coffee time after time, day in and day out for year after year.
I consider priming my machine as an important preventative maintenance step and run a light priming every other week with bicarbonate of soda and a full proper priming every 3 months even if the prime message doesn’t appear (it never does). When scale is not building up in my machine I know the heating element, needles and pump will last longer.
Join our cool coffee community and join in by sharing your own tasty must try recipes and coffee creations and the hilarious must share memes and jokes. Find us on Facebook/Meta.


